

Mordant Printing!
I'm freaking out.
I’ve dipped a toe into dye a few times. No, not actually.


I have taken a handful of natural dye workshops over the years, some geared toward bookarts and papermaking, and some dye-specific. In 2018 I briefly worked on a farm in Virginia, and I spent my days off collecting plant material and dyeing wool yarn. That yarn is still finding its way into hats for my girls.
During the pandemic I took a virtual indigo workshop with Radha Pandey, which was empowering: learning to create an indigo vat on my own! This was about a month before Ursula was born, and I ended up doing more indigo dyeing just before Beatrix was born.
And in our final weeks in Murray, I dyed silk scarves for the girls to play with….from the goldenrod and dahlias and the pits from a billion avocados the girls ate. These are color-souvenirs from that magically scruffy place.
I love natural dyes because it’s about learning plants and what they do, and it is rooted in old, old knowledge. And in the ways I just described, there can be a very specific connection to a place. These are probably the reasons EVERYONE loves natural dyes, right?! And ooooh the colors! For me and my creative practice, it has never really taken a significant role. Just a fun diversion!


If natural dyes are magic, chemistry, and mysteries, screenprinting is brilliantly direct. The screen is either OPEN, allowing ink to pass through, or CLOSED, blocking the ink. Yes or no. I love it, and I have enjoyed focusing on teaching the process over the past three semesters at SUNY Oswego.
When I moved to Murray in 2019, I started screenprinting again, returning to a process and a printshop from my formative undergraduate years. I started printing on fabric in Murray, teaching myself a lot. Slowly. Something has bugged me all along about screenprinting, both on paper and particularly on fabric: the ink! I’ve often fought against the colors of the ink, and most of all the plasticity of the ink.
I abhor plastic.
So the notion of combining screenprinting and natural dyes has been percolating since Murray. Way back in 2021, in the days after Ursula was born, I started doing some blurry-confused-postpartum-brain research into mordant printing. I read and re-read parts of The Art and Science of Natural Dyes, recommended to me by the wonderful Cat Liu.
Then came Beatrix, and the MAJOR LIFE UPHEAVAL as my family relocated to New York! While we were living in a rental for a year and a half, all my dye stuff was boxed up in the attic. BUT NOW WE’VE MOVED! The things that were in the attic are now in a barn, but so much easier to access. So here we go! My first mordant paste experiments!
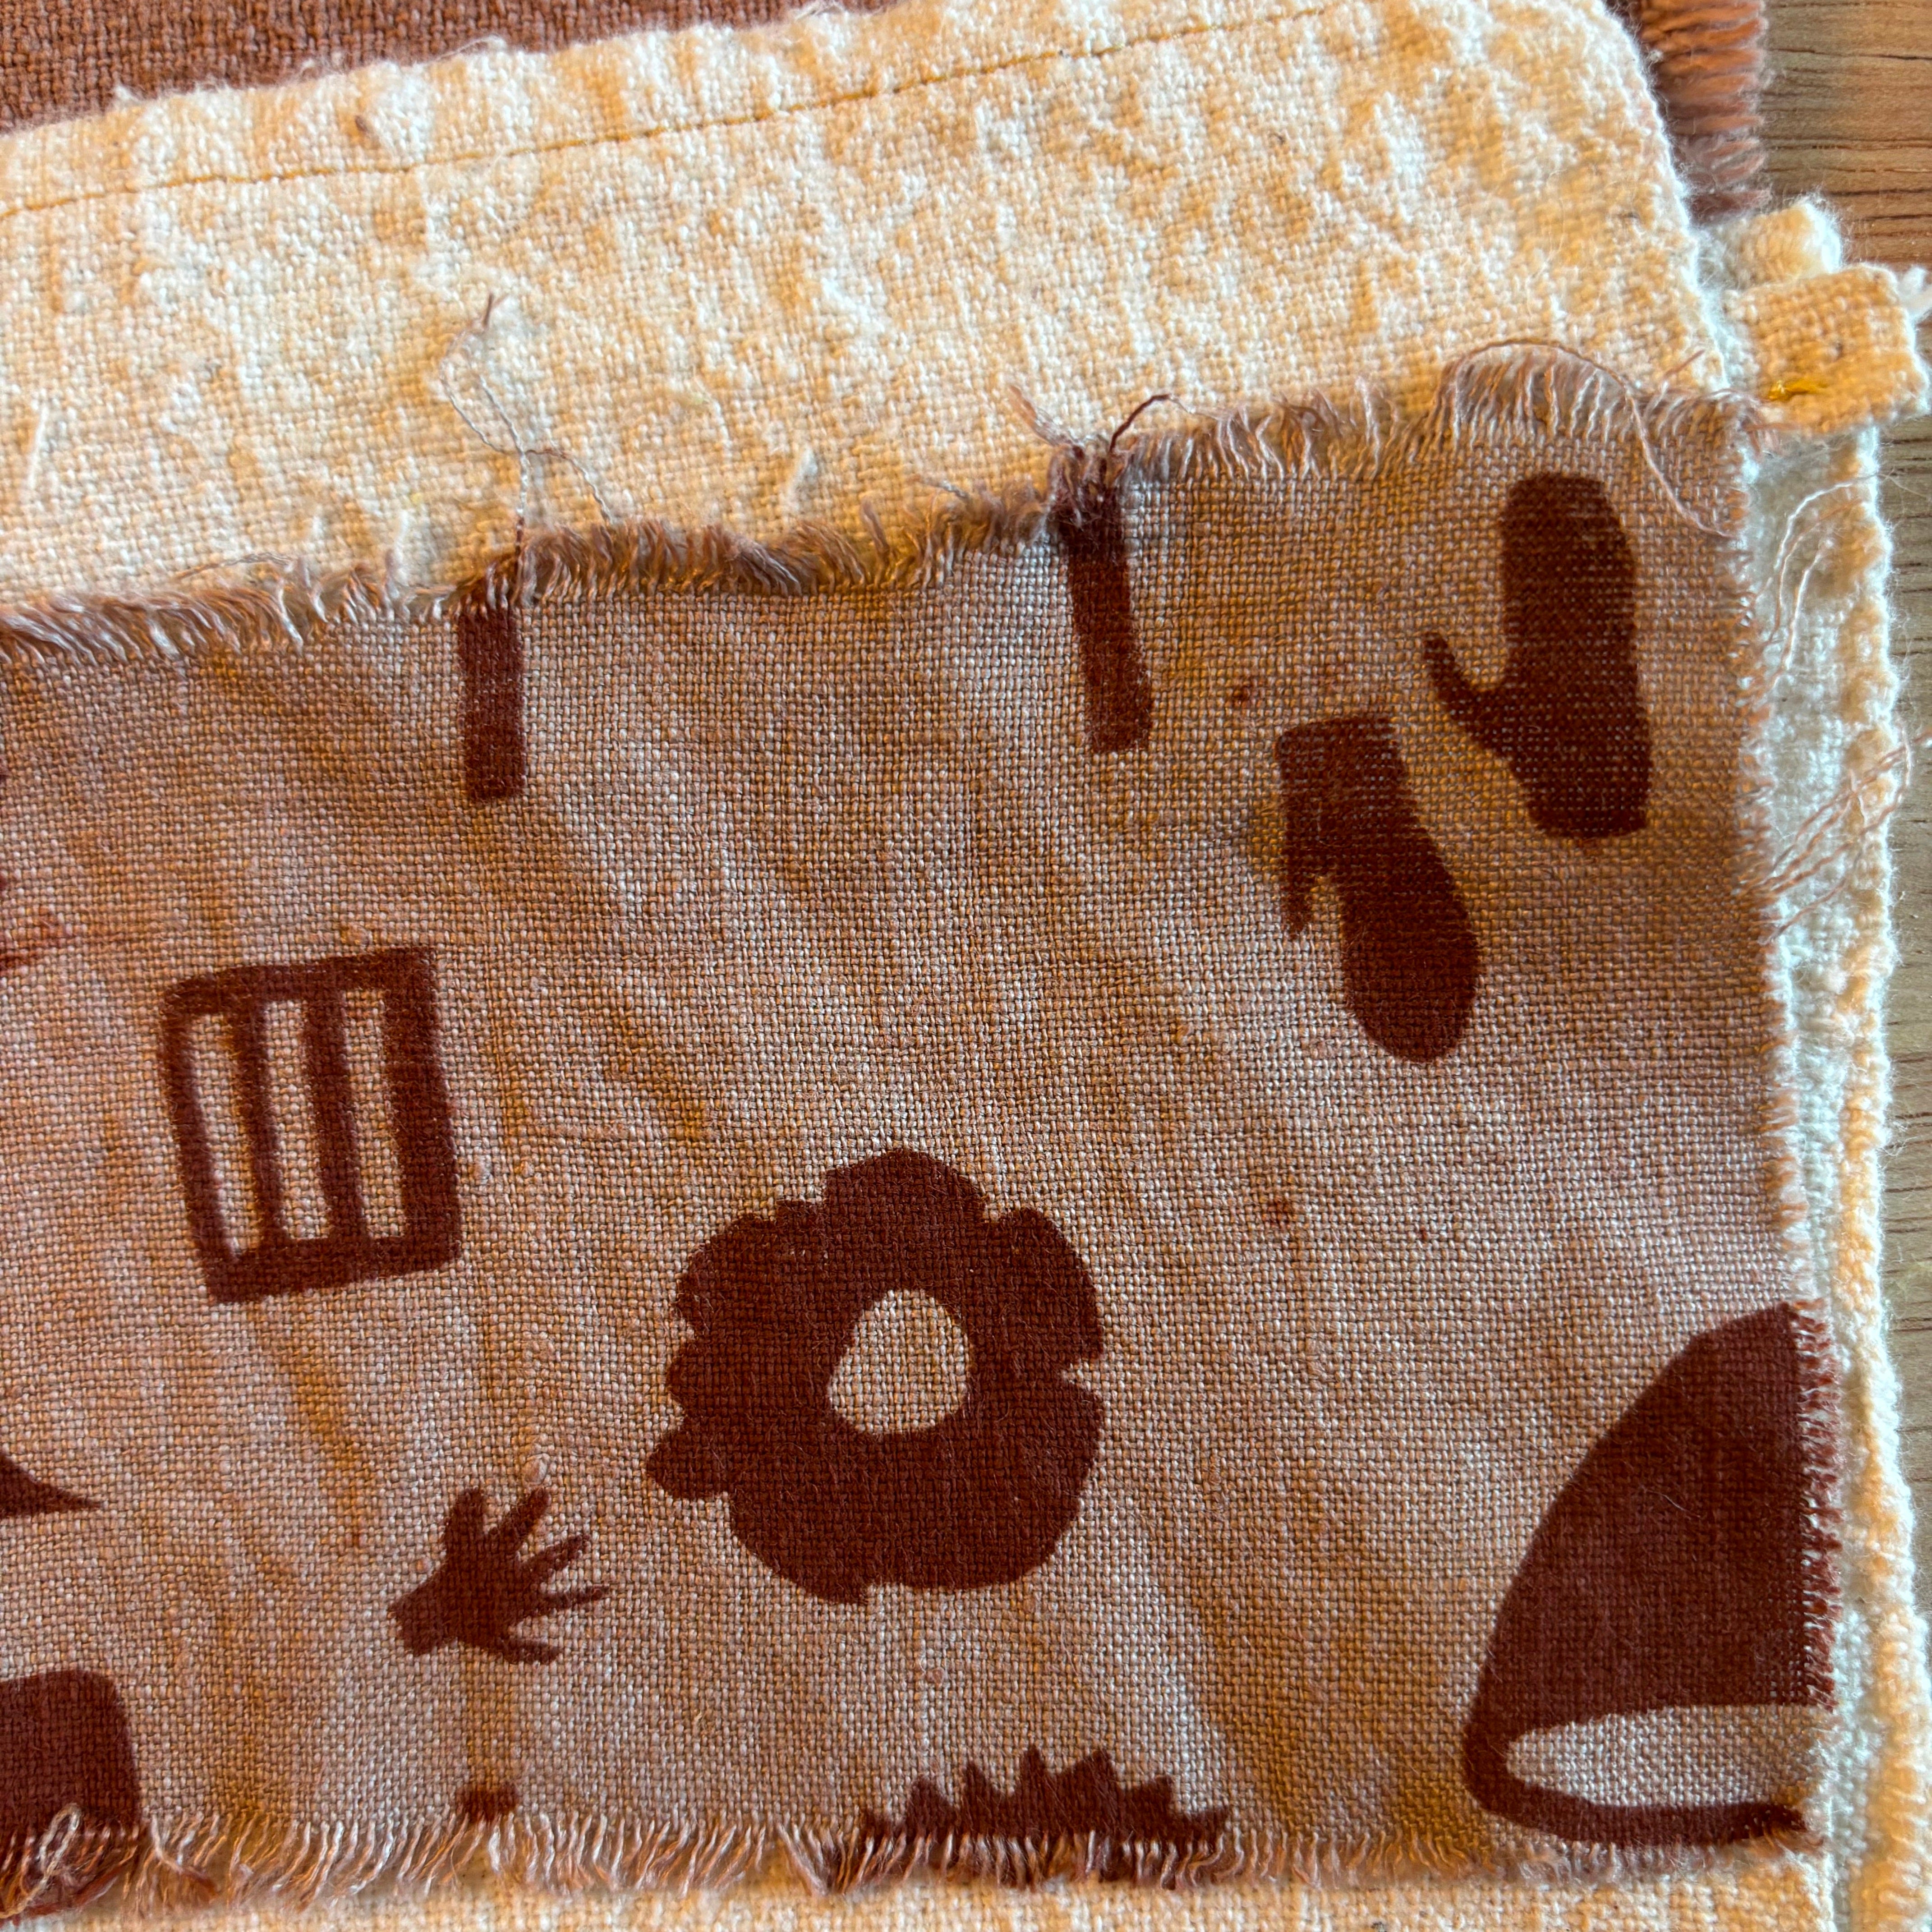
I’m not an expert on any of this, so I won’t delve too deeply into explaining everything about natural dyeing; there are resources far more knowledgeable and eloquent than me! Mostly I want to share what’s happening and write/think about the WHY of all this. But in brief: a mordant adheres to the textile, and the dye adheres to the mordant. So I made screen-printable mordant-pastes. These were printed onto my fabric (like invisible ink!) and then later submerged in a dye vat. The dye forms a permanent bond with the parts of the fabric that have been printed with a mordant.
I REPEAT: This is not ink sitting on the surface of the fabric. The fibers of the fabric are dyed!

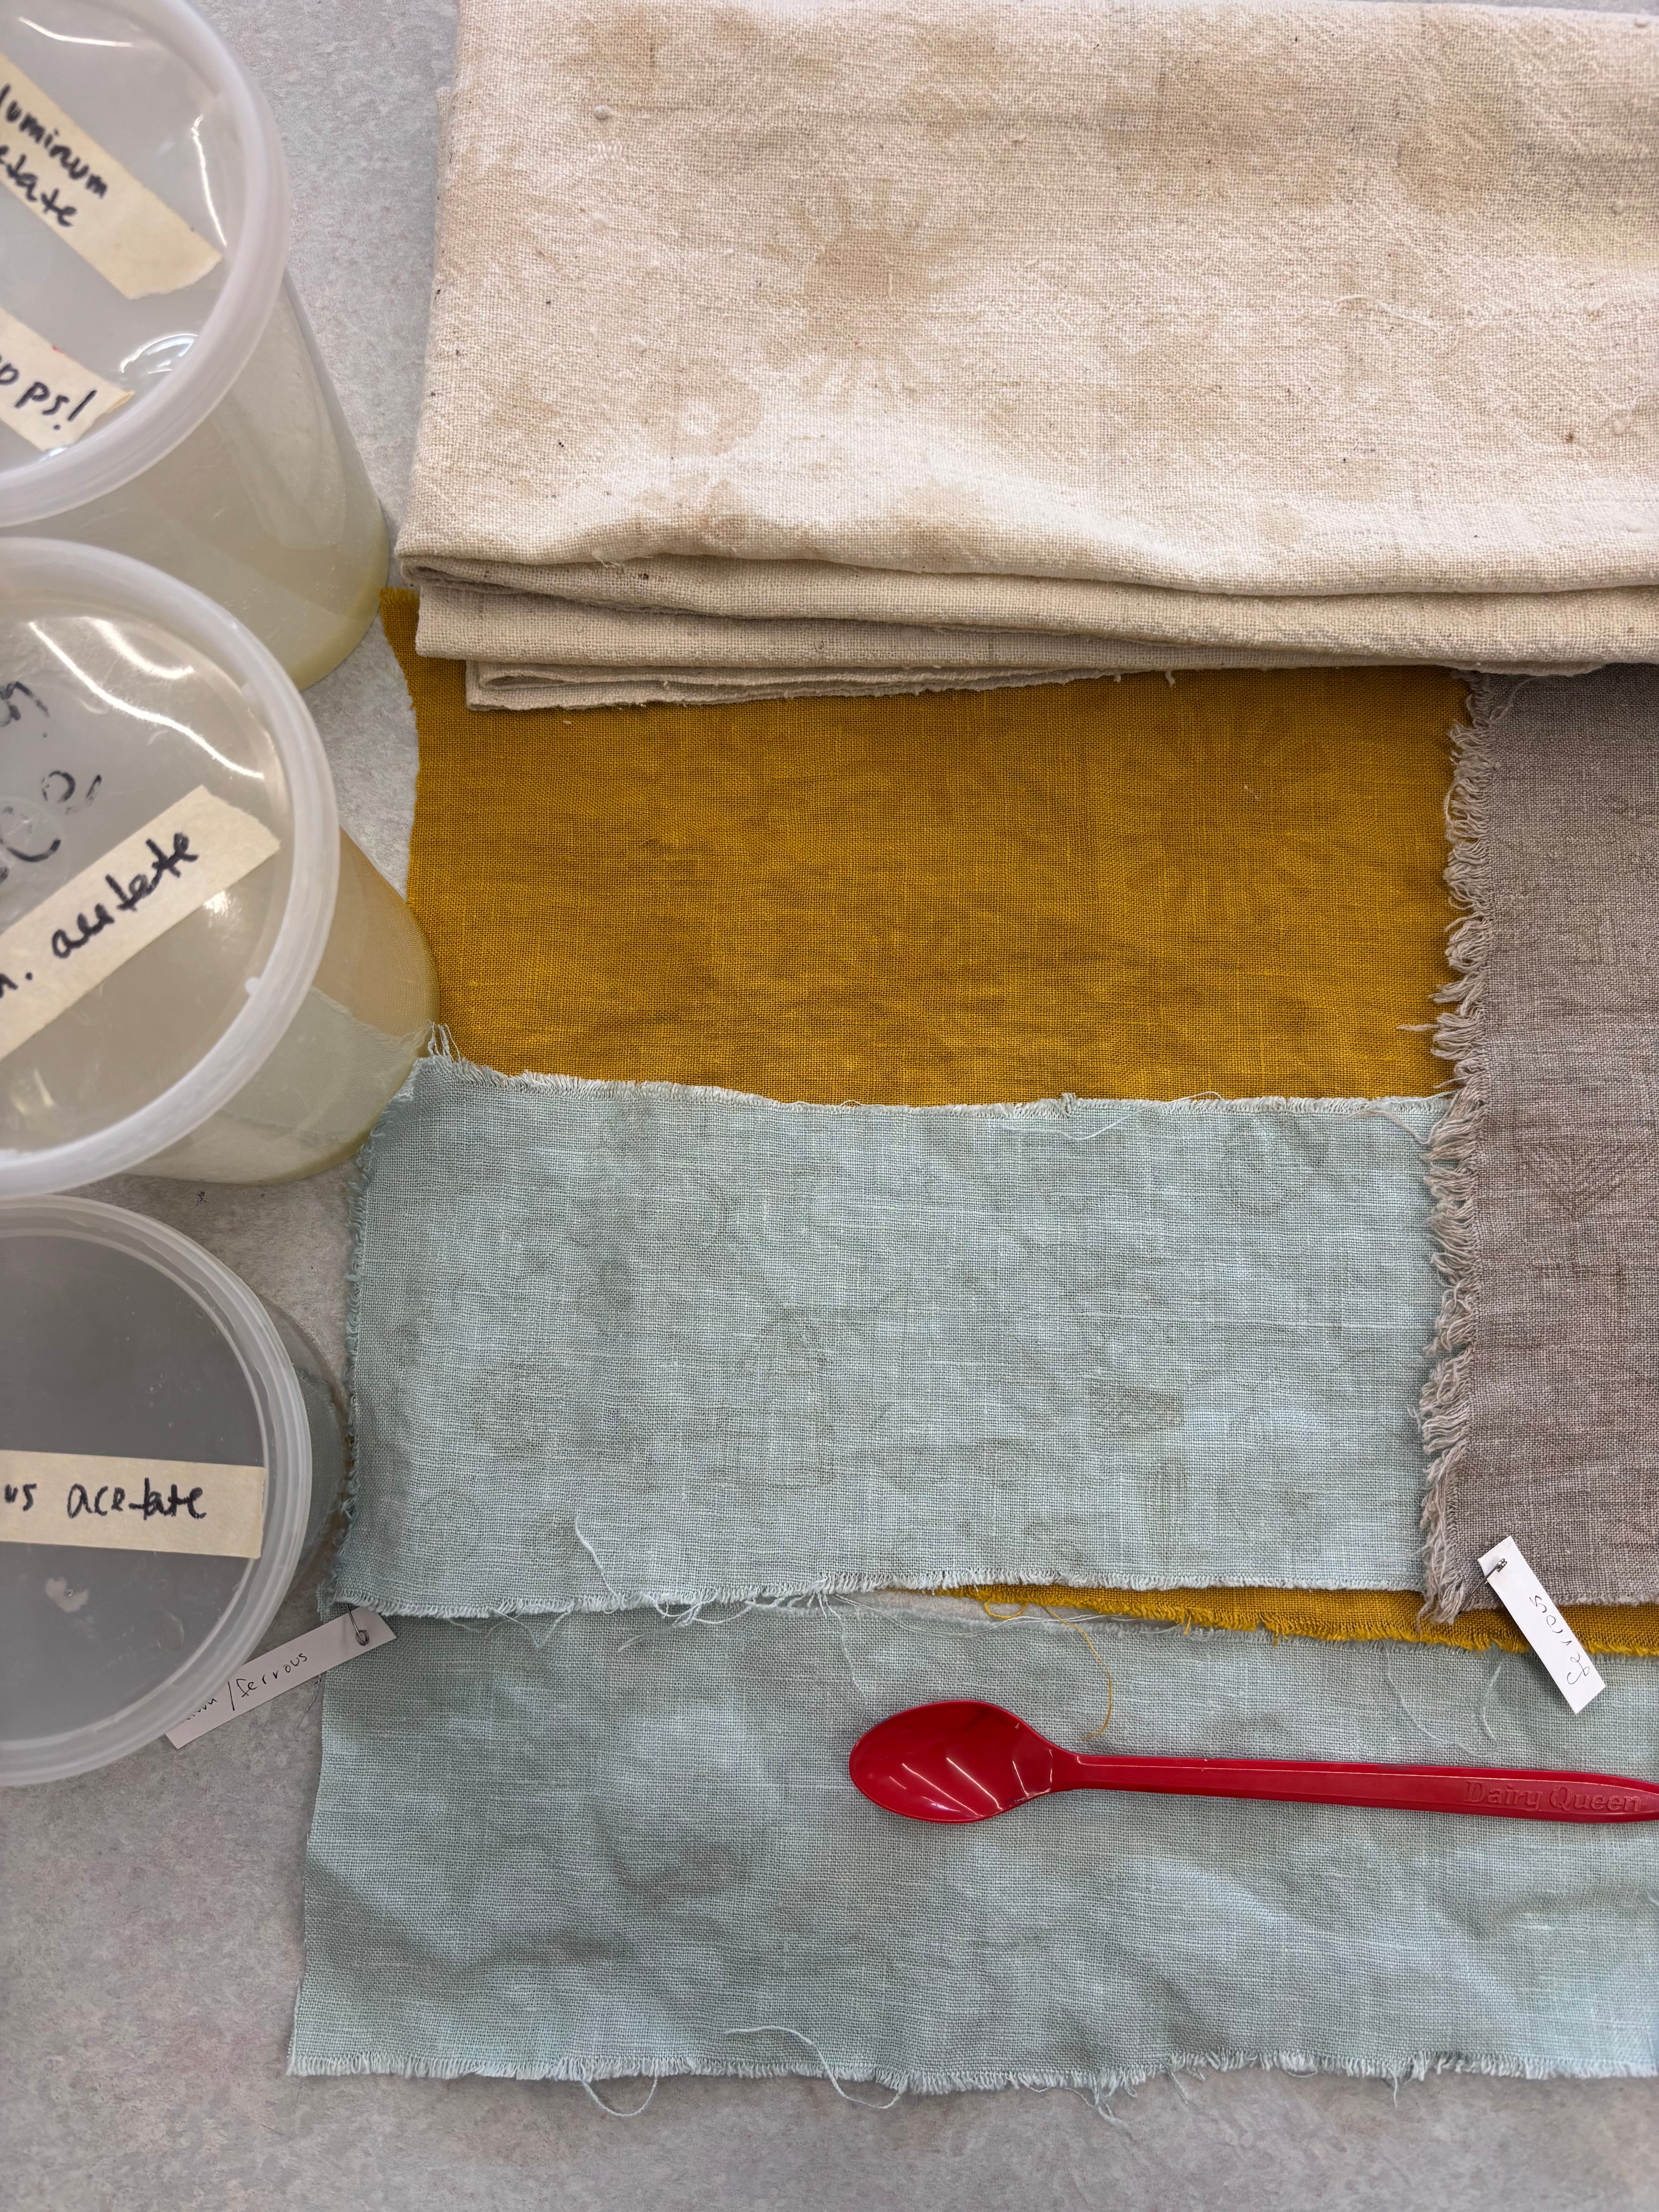
MONDAY: The first step was scouring the fabric, which bubbled away while I mixed up the mordant pastes. “Scouring” removes dirt and oils from the fabric. Some of the cotton cloth I’m using is very rustic, (bits of plant material visibly woven in the cloth!) so this was important, and resulted in some murky water. In addition to this mystery-cotton-yardage passed along by my father-in-law, I prepped various linen offcuts: natural, a mustardy yellow, and a pale blue.
I made two mordant pastes: aluminum acetate and ferrous acetate. Then I made more aluminum acetate because it didn’t seem like much. I used guar gum as the thickener, and learned what consistency works best as screen printing “ink.”
The dyes react differently with the mordants, creating entirely different colors from a single dye. Science! Magic!


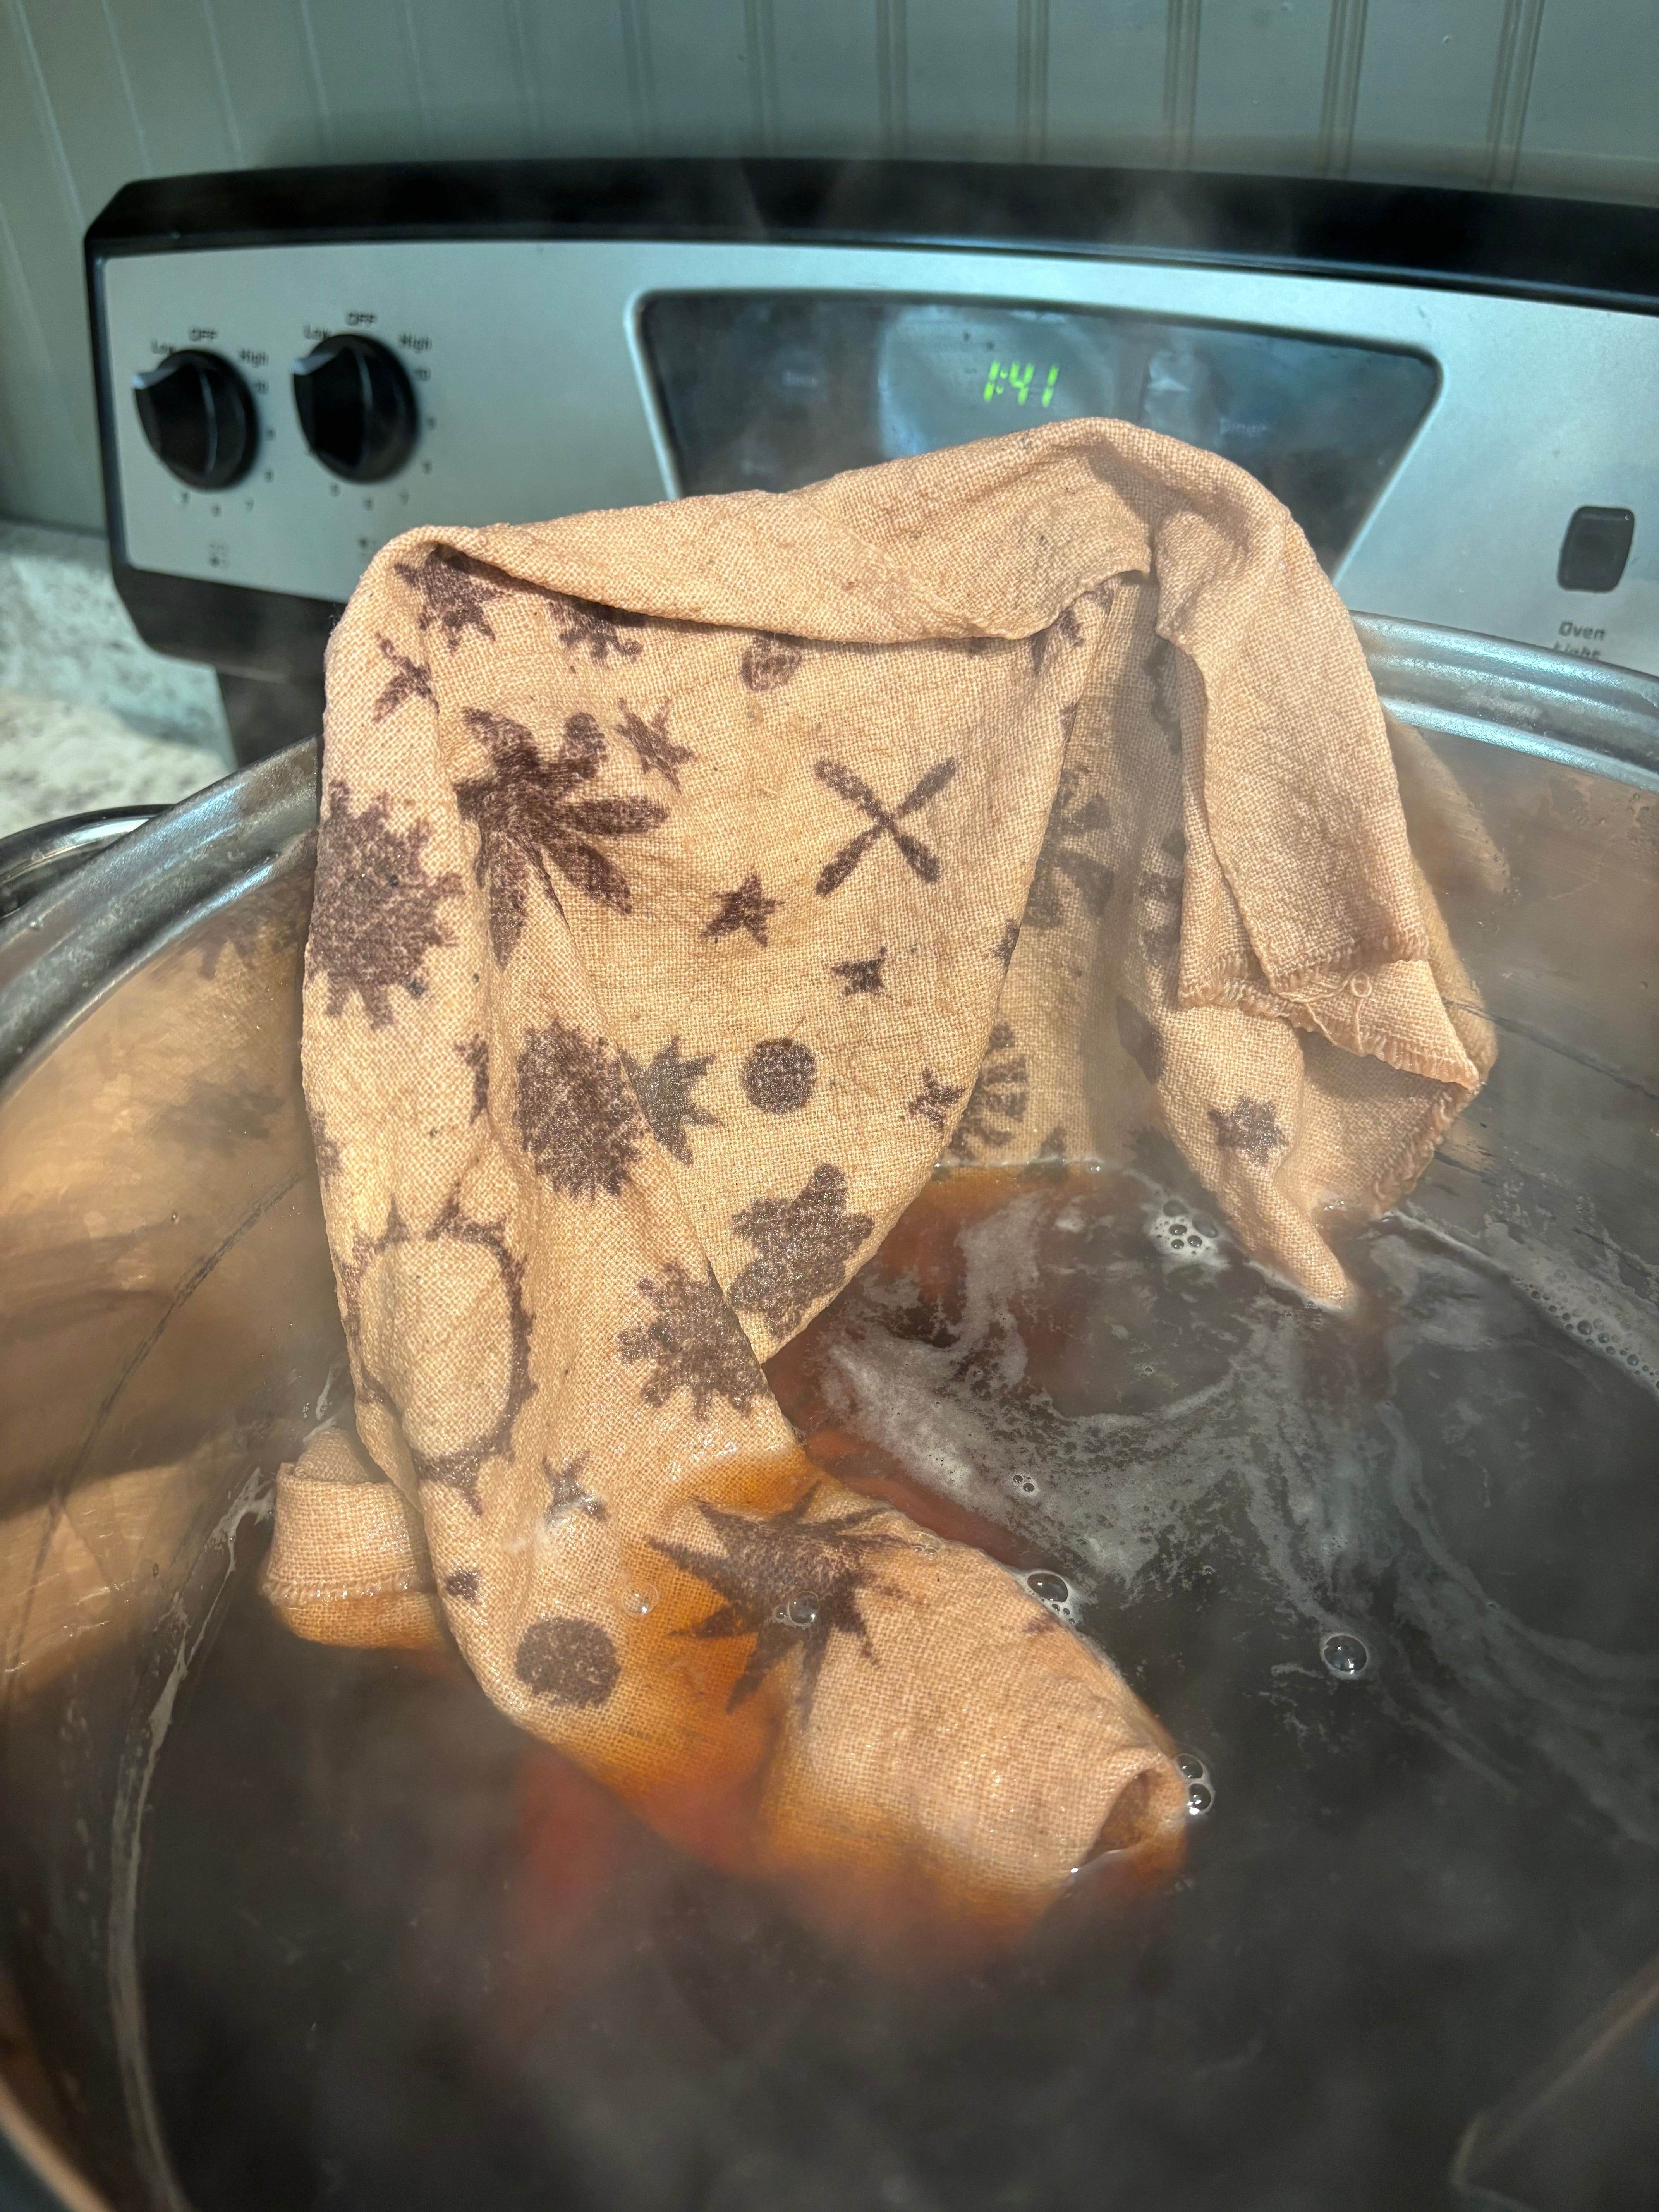
TUESDAY: Before and after teaching my class, I printed my mordants on the fabric, and gave my students a quick, too-enthusiastic little presentation of why I was stinking up the studio with vinegary-invisible ink.
The iron-based mordant turned lightly rusty-looking as it dried. The alum-based mordant really was like invisible ink. The recipe suggested adding brazilwood extract to make it visible at this part of the process, but I did not do this.

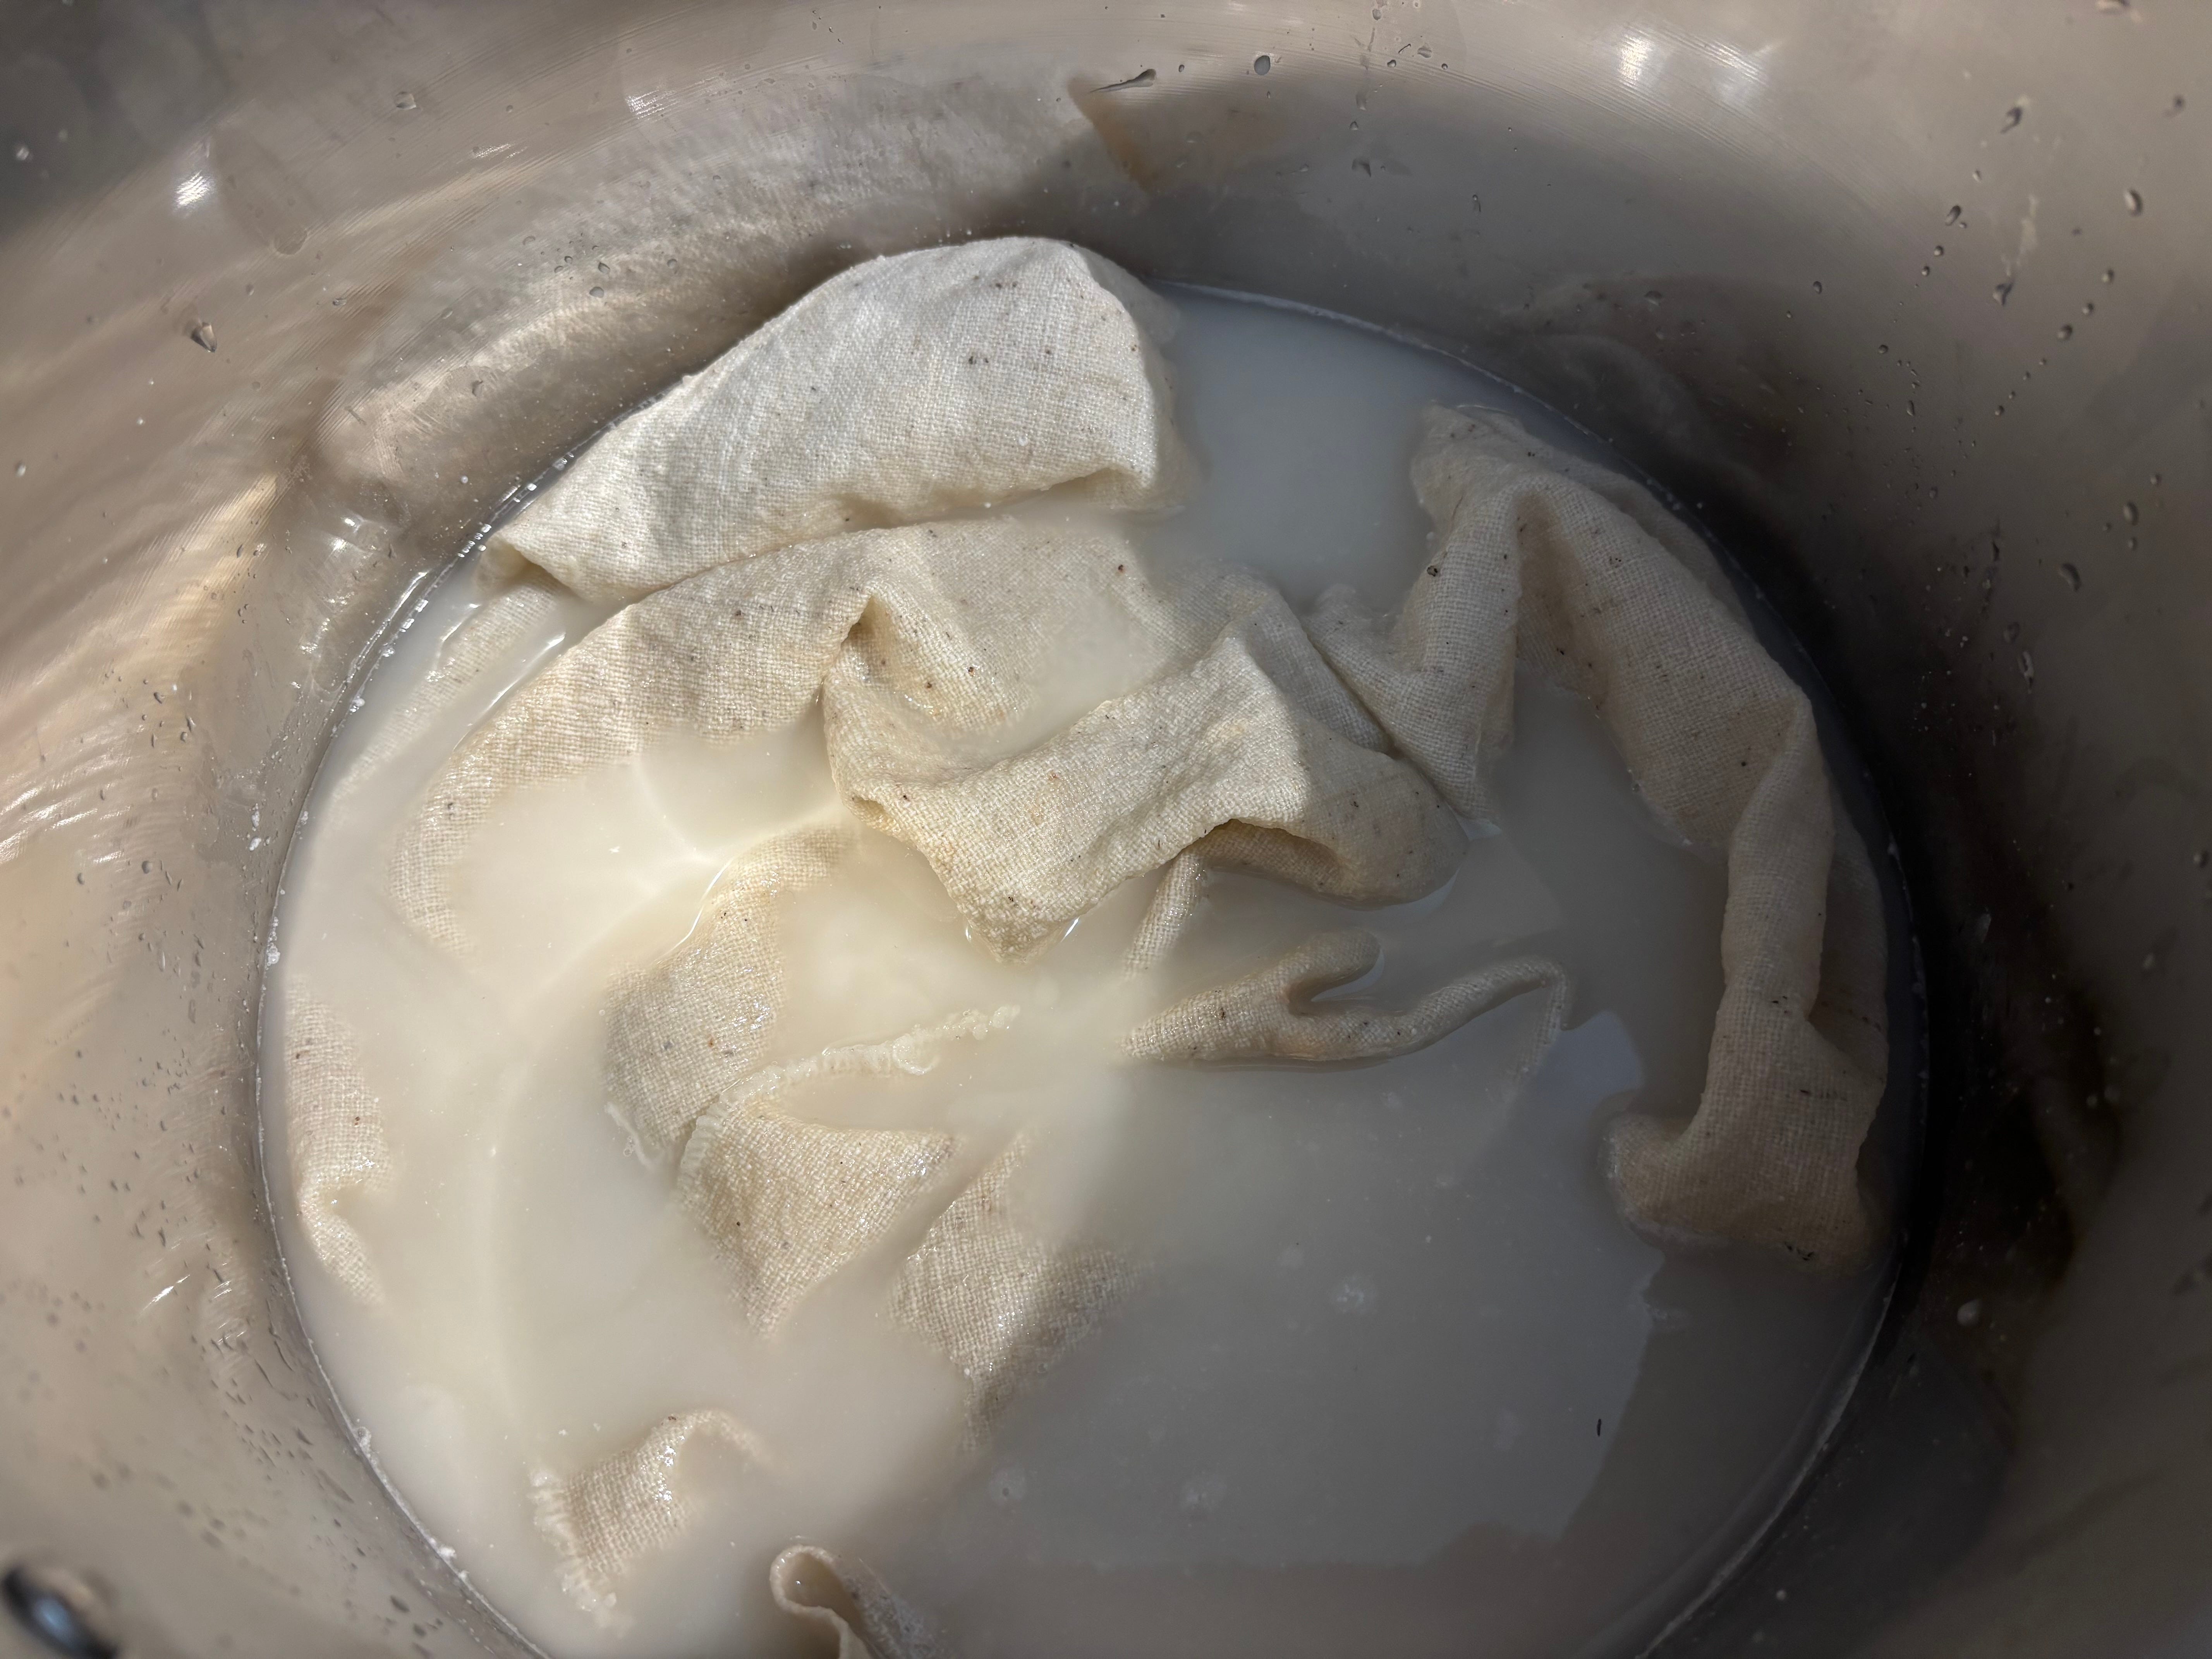
WEDNESDAY: After printing, the fabric dried thoroughly, and all the vinegar evaporated away. Then the fabric was “dunged,” which thankfully involves soaking the fabric in a solution of warm water, chalk and wheat bran, and has nothing to do with manure. I do appreciate the carryover of the more traditional method as the name for this process, though. This step neutralizes the acid and dissolves the guar gum. (I think!)
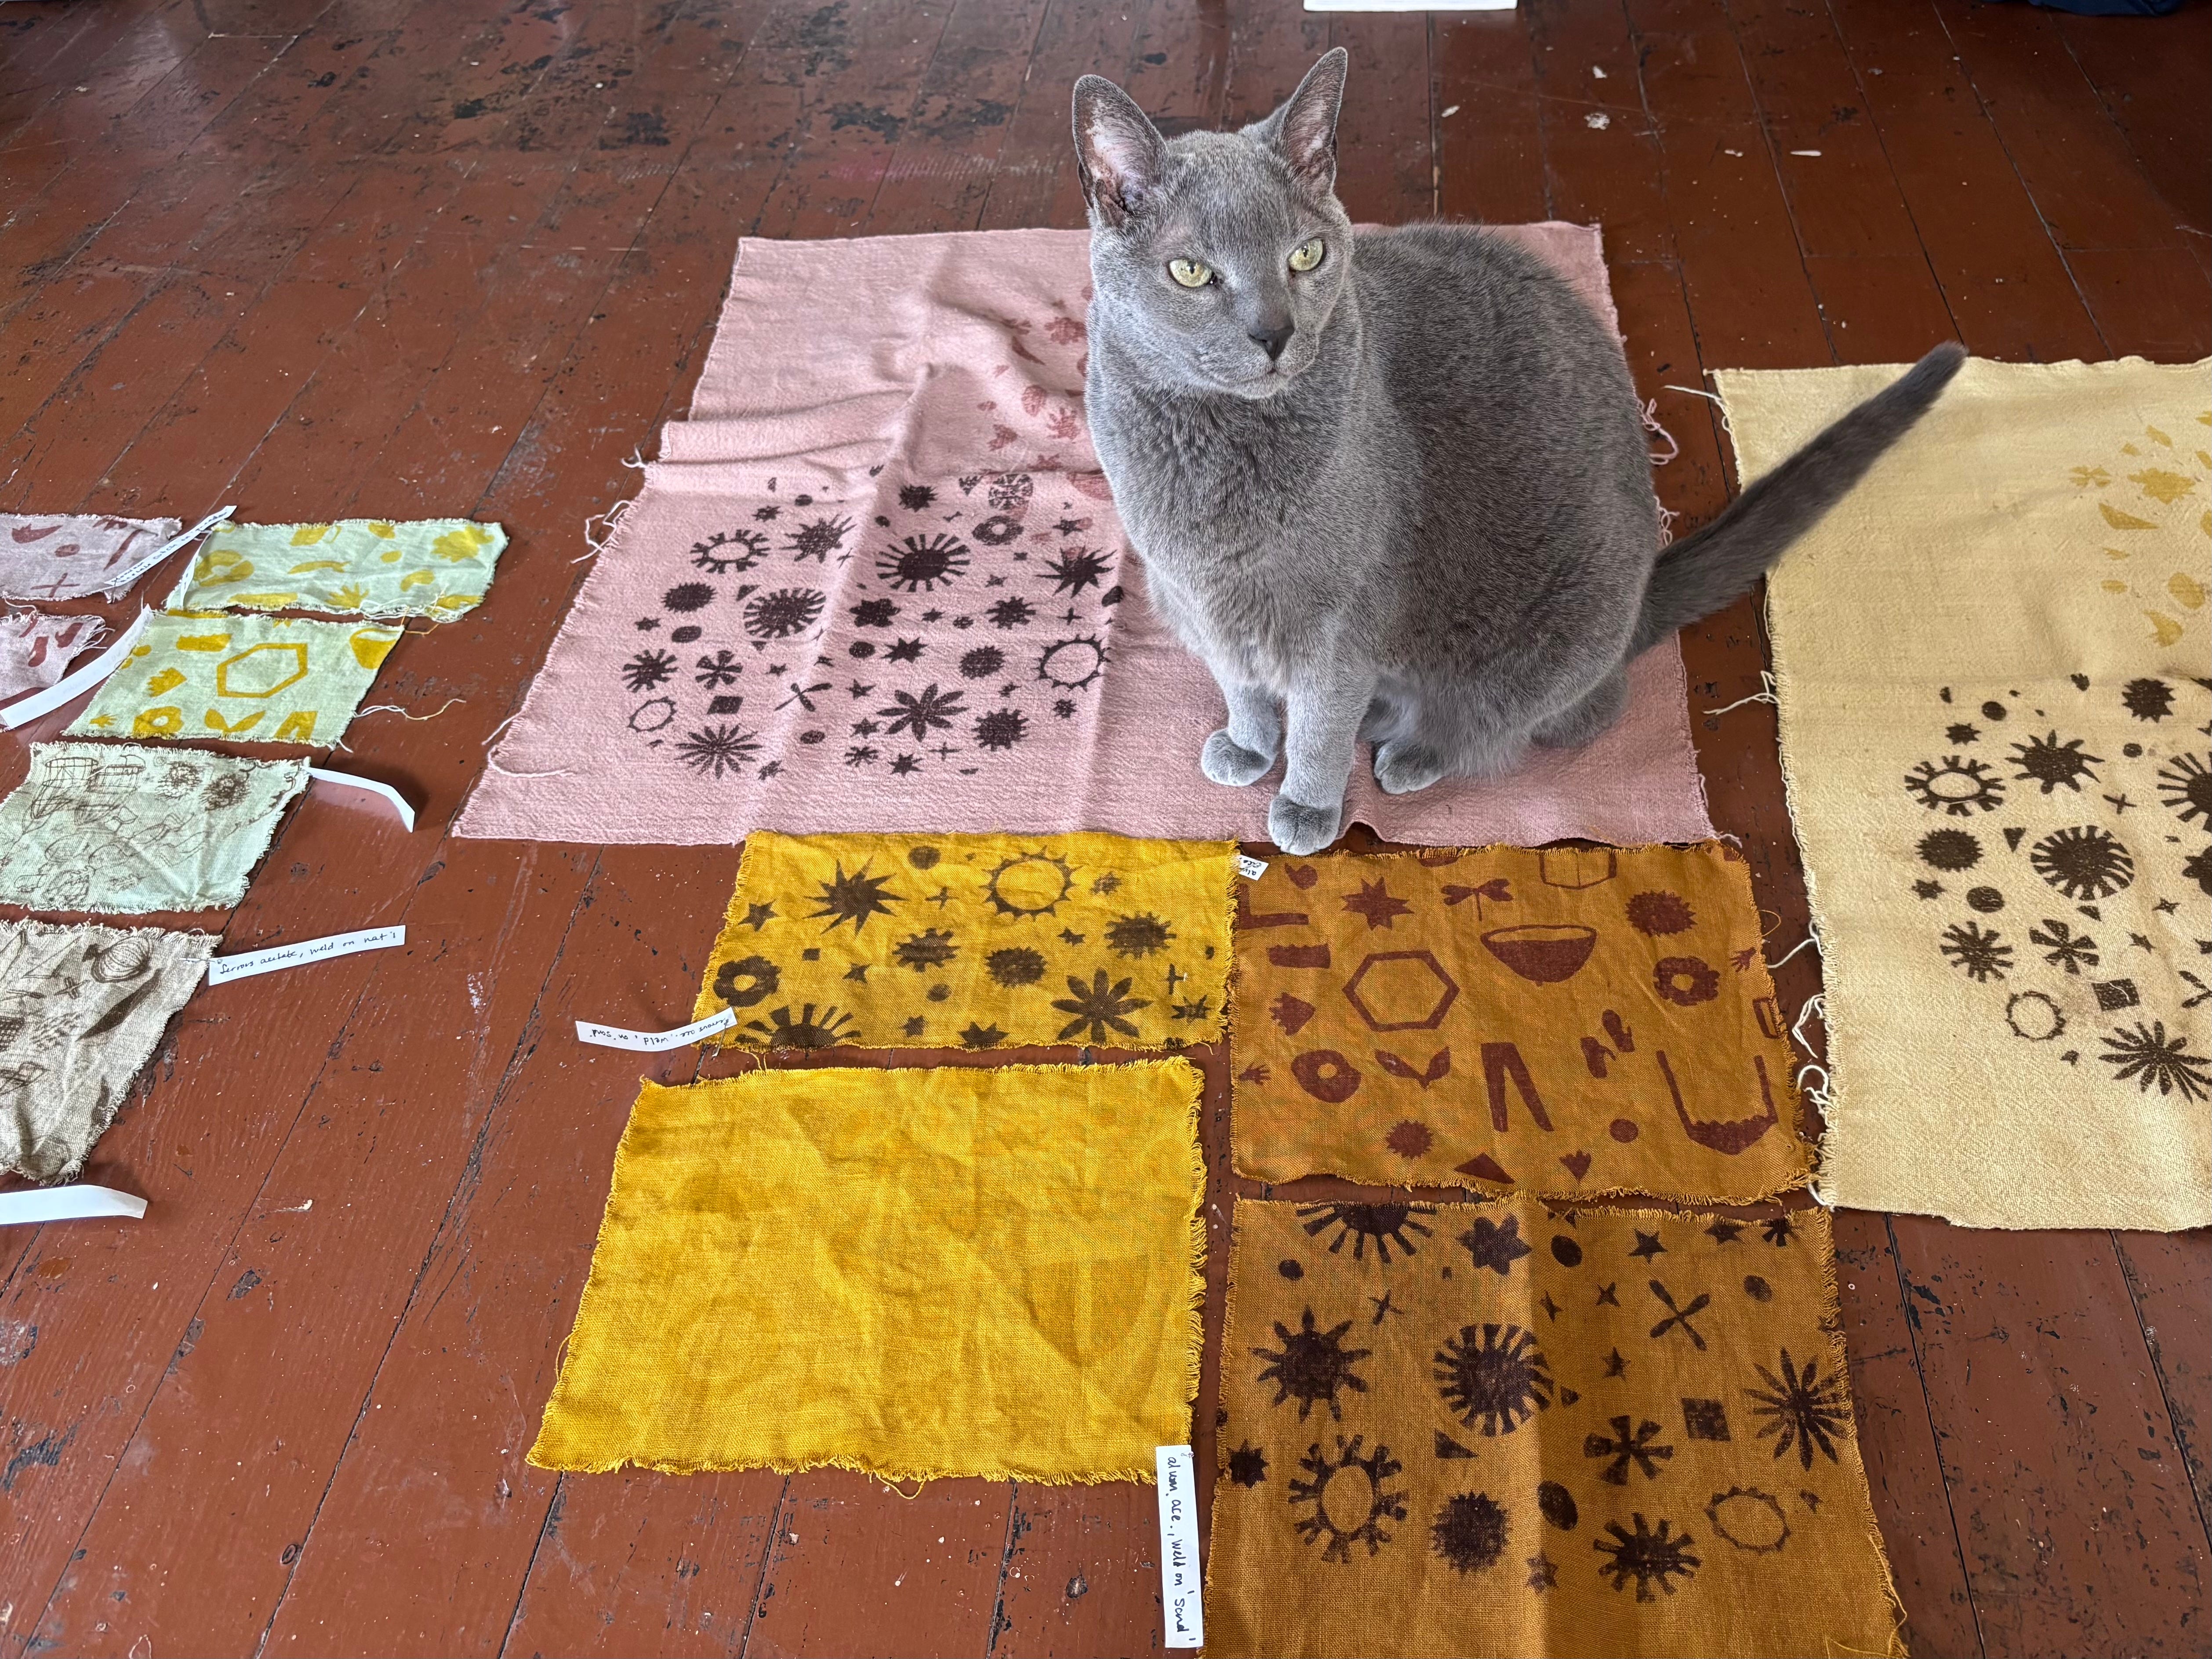
After rinsing, the fabric was ready to go in the dye! I made two dye baths, CUTCH and WELD.
I’d worked with cutch before. It makes some lovely pinky browns, and the dye has a sweet earthy smell. Cutch extract comes from the wood of the acacia tree if I remember correctly. My cutch extract was from Maiwa.
I had not worked with weld before, but I will certainly be working with it in the future, and possibly growing some on our little piece of the planet. There are so many dang plants that make a yellow dye, but weld is one of the most lightfast yellows. My weld extract was from Botanical Colors. It also smelled good.
All my bits of fabric were in the dye pots about an hour, maybe a bit longer.
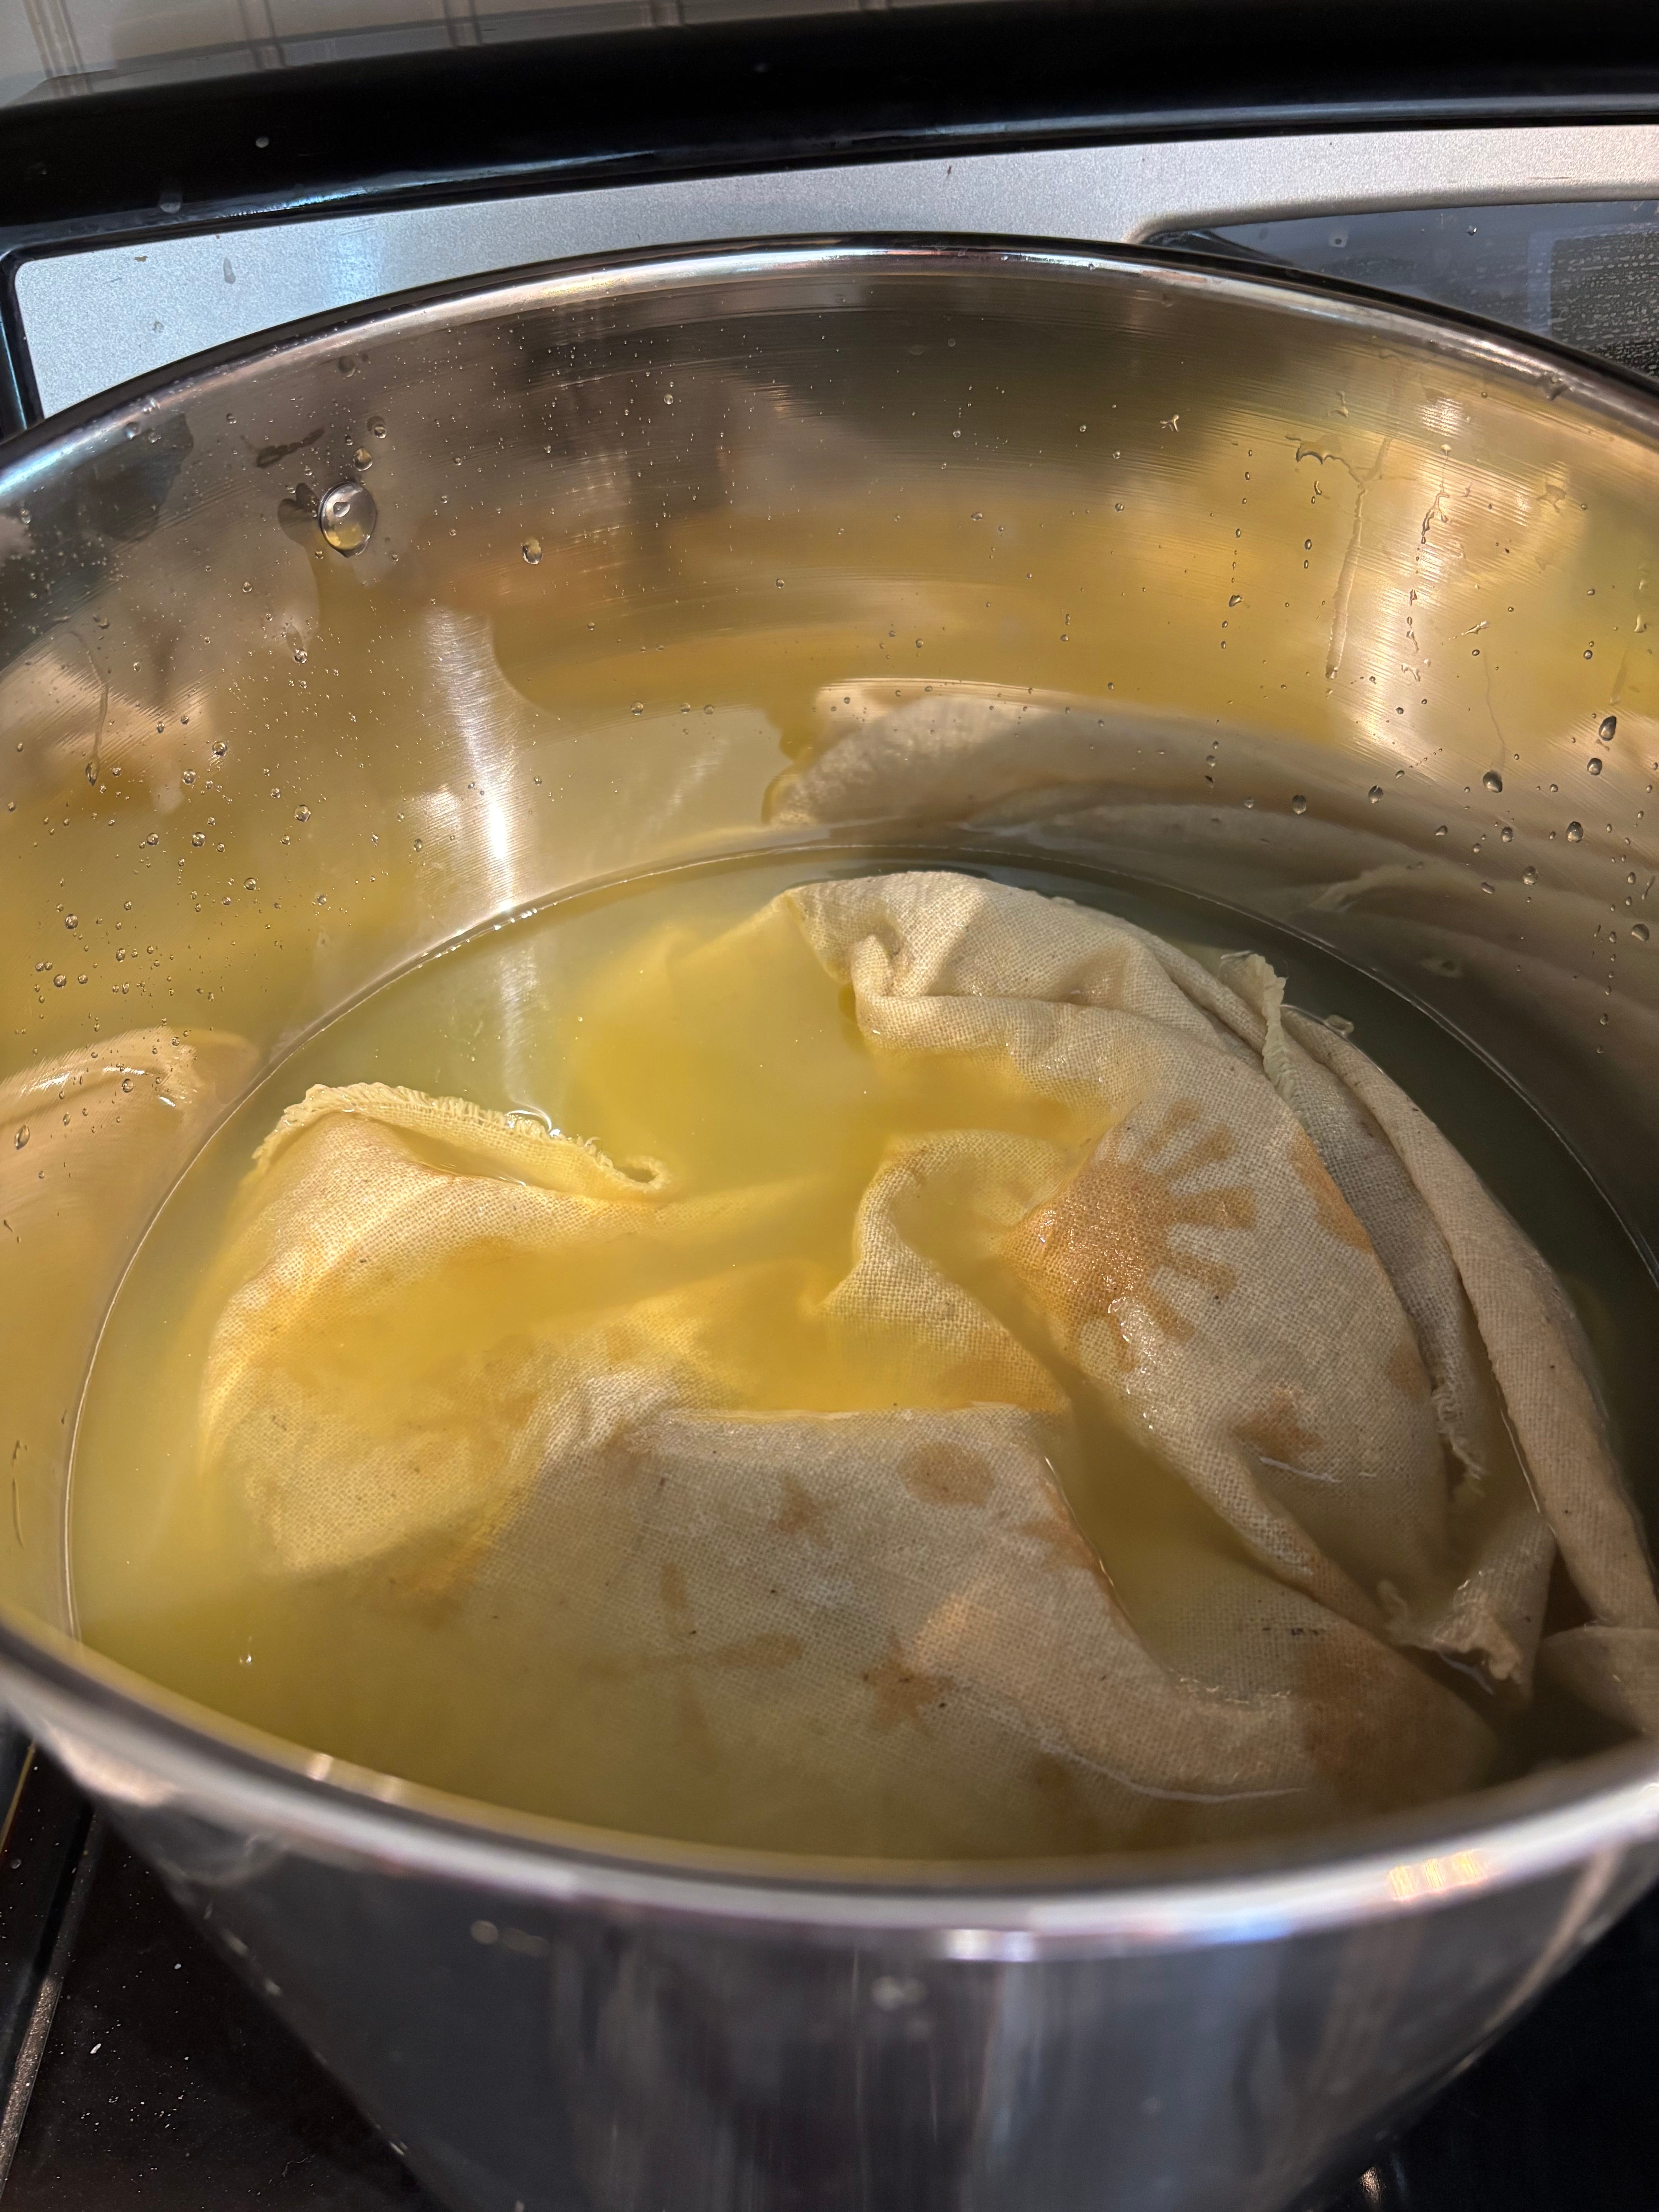
After cooling in the pots, and after getting the girls home from school and doing dinner and all the things, I rinsed the fabric and then boiled them in water with a little wheat bran. This final process was to remove some of the dye that attached in the background of the fabric. I think I could have done this part a little better, (or longer?) but I was tired and it was late! The background areas will fade more over time, because there’s no mordant in those areas of the cloth.


I was buzzing with energy all day on Wednesday! I was on my feet far too long, and could barely be bothered to stop and eat lunch. A dyeing session like this is so exciting, but it’s a lot of work. A lot of rinsing. One of my takeaways is to pace myself next time.
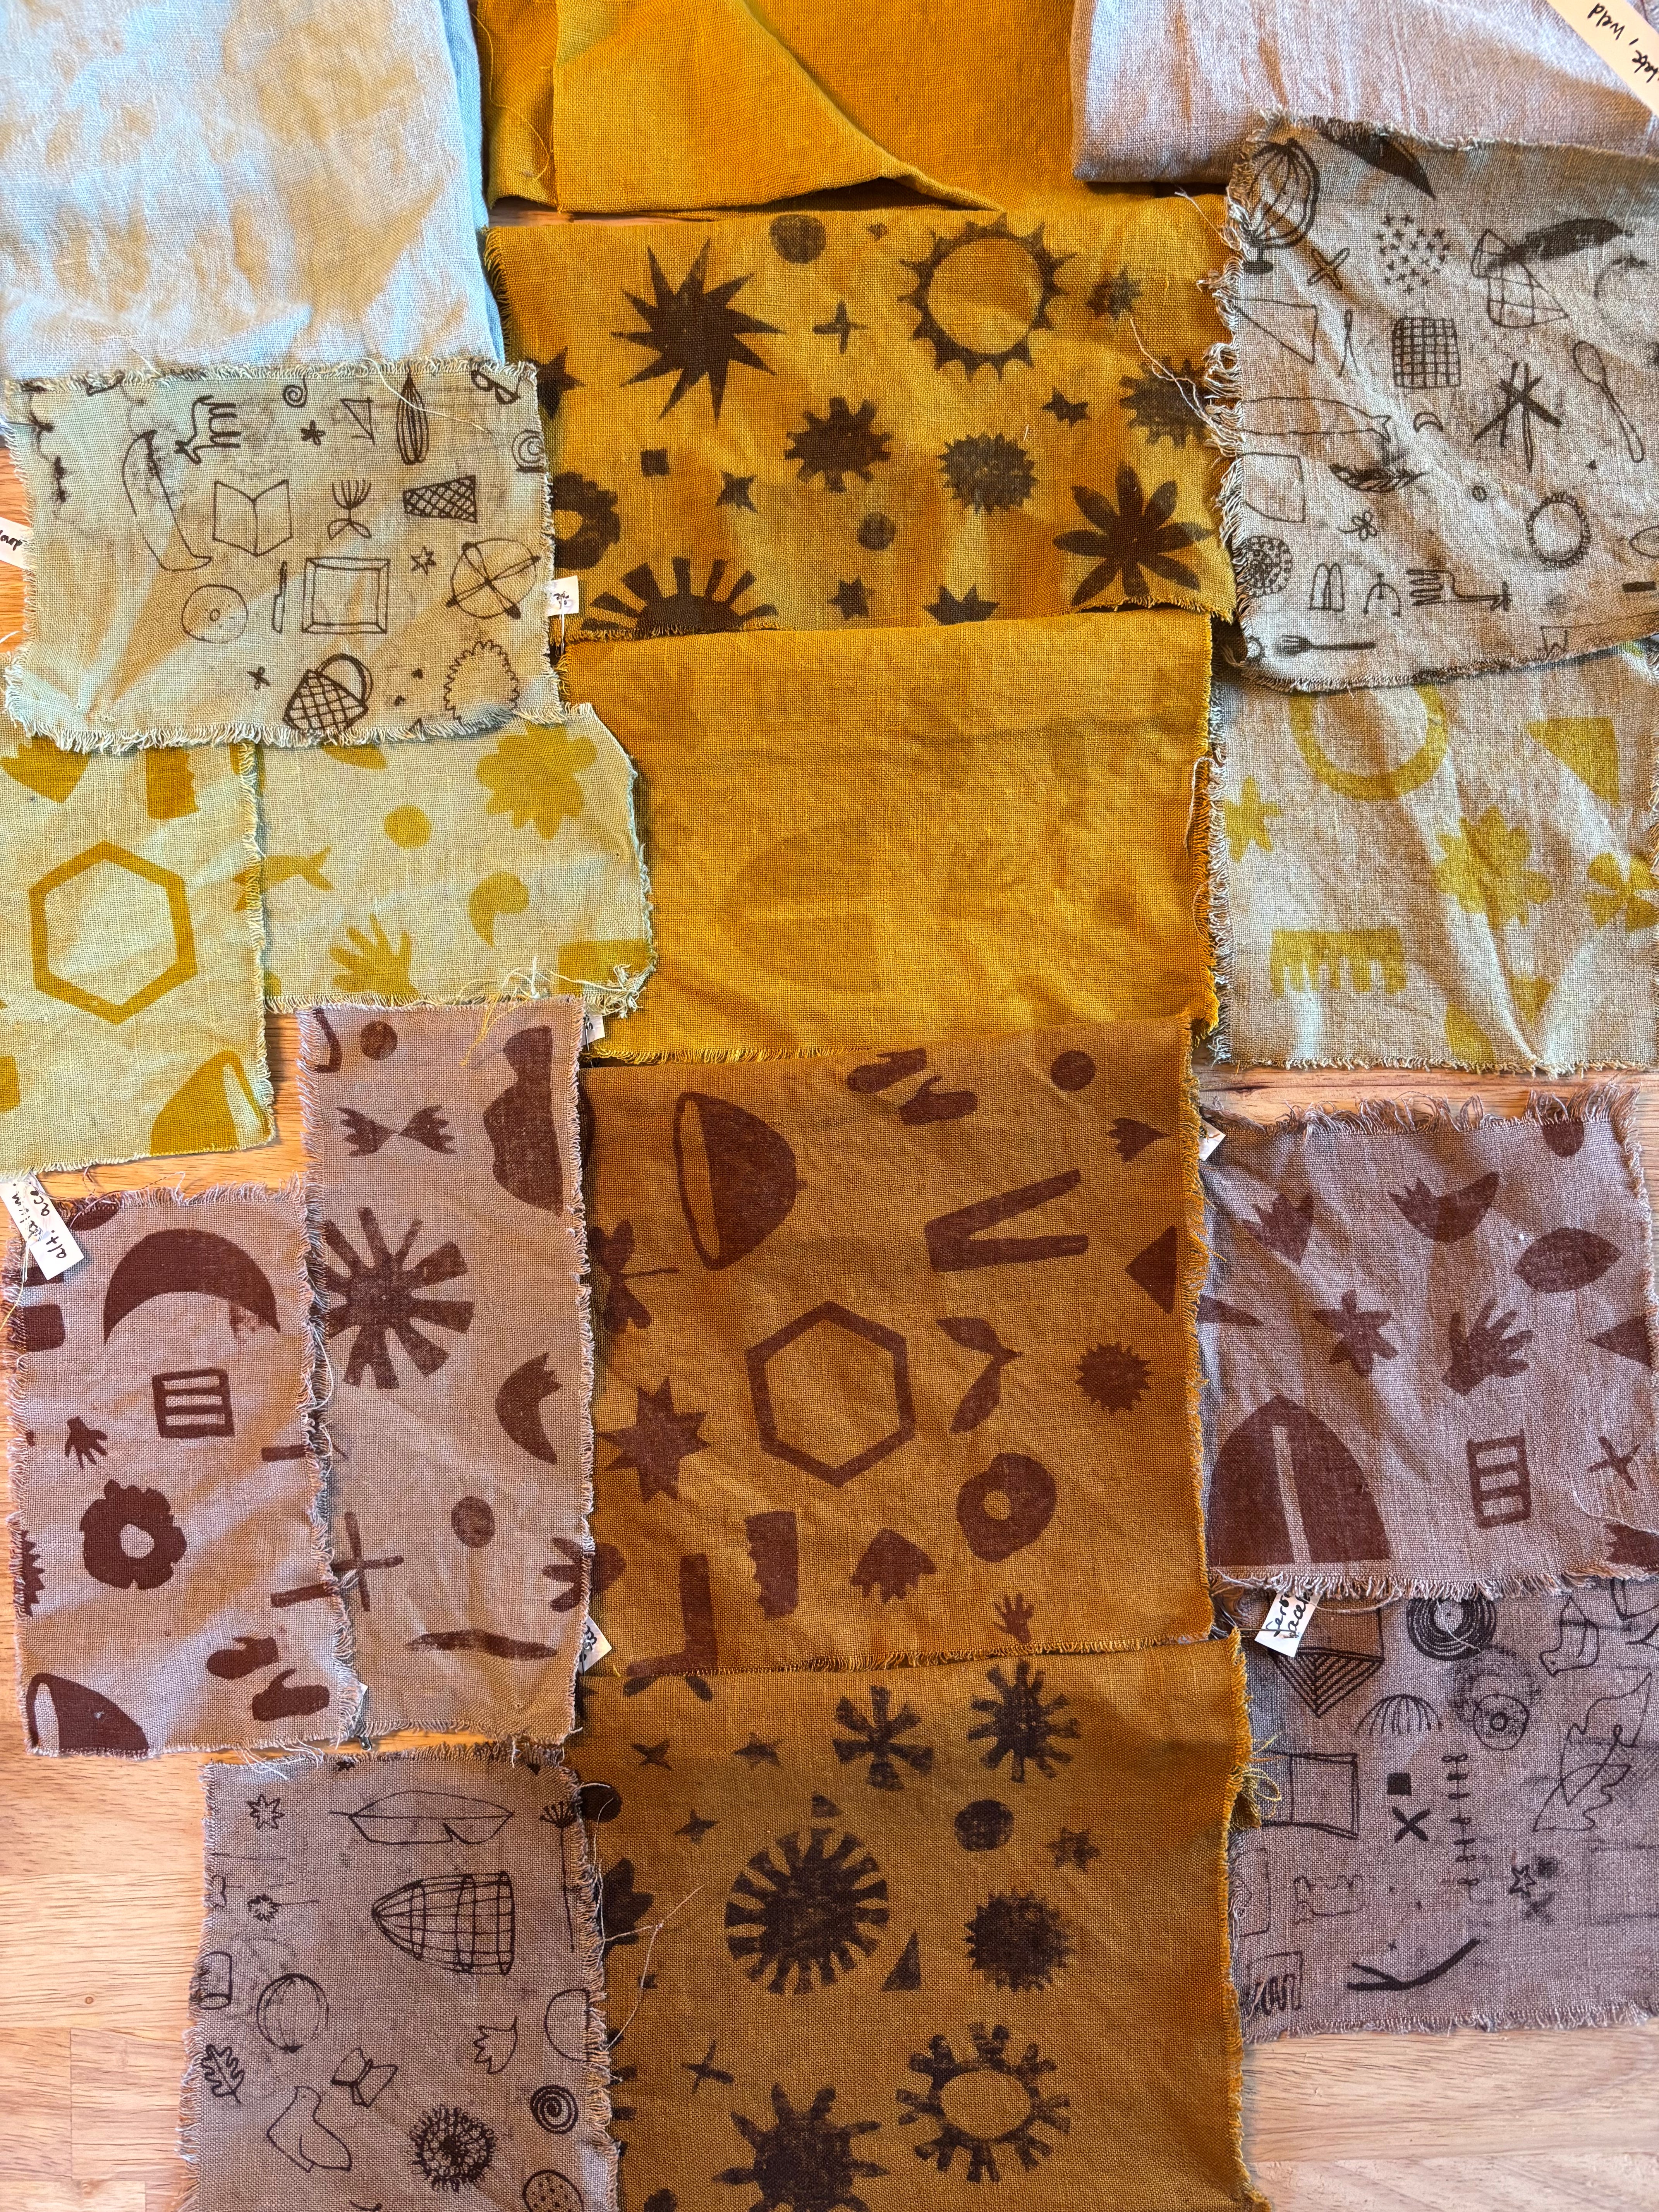
After the thrill of the colors emerging and the satisfaction that it had worked, I took a few days to look at the results, and evaluate what I actually like enough to do in a larger project. One thing I will do next time is have more things prepared for when I’m dyeing. The mordanted fabric can be dried and saved to dye later. On Friday I tried to use up the pastes on some other previously-dyed material, for future over-dyeing.
Other findings: Two dye baths at a time was a bit much. And initially I wanted to do a third! I’ll probably keep my focus on Cutch and Weld for now, and I have Cochineal (bugs!) I have yet to use. I’m not trying to make rainbows; I’m trying to achieve colors that feel correct for me and my work. So limitations feel right.

I was surprised at how successful the fine-line images printed, and I didn’t test that screen with the aluminum acetate at all, so that’s on the to-do list too!
If you’re still with me, thank you for reading!
This is all so cool—and so interesting to get the full report on this ongoing investigation. Love the idea of screening the resists in a large edition and then dyeing over time in different dye baths. I’m completely with you on the downside of plastic screen inks. I learned silkscreen before water-based inks were invented, when we all bathed in turpentine. Horrible of course but the resultsnt ink film seemed better.
I’ve got plenty more cochineal if you want it—given to me by my dad 40 years ago who must have saved it for 40 years before that!
Great read! Miss y’all in Murray!